I am a cake obsessive, based in West Sussex, UK.

I started off making cakes for family and friends before giving up a proper career in favour of playing with sugar full time. Having worked for two bakeries making their wedding and celebration cakes, I am now looking toward world domination with breaks for coffee and chat.

If you are interested in seeing future projects, enter your email address in the box on the right for updates.

To see my website go to: www.kasserina.com. You can email me on info@kasserina.com.

I also sell some sugarcraft items on Etsy. Please go to https://www.etsy.com/uk/shop/KasserinaHome?ref=hdr_shop_menu

Thanks for looking!
Showing posts with label cake. Show all posts

Sunday, August 07, 2016

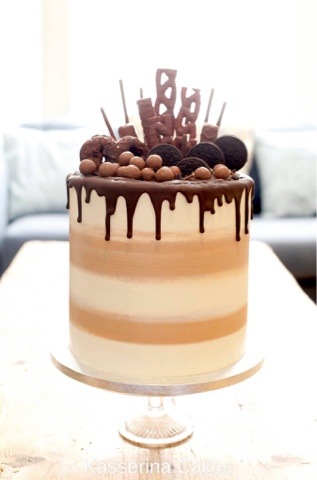
Chocolate and caramel candy cake - August 2016

A tower of chocolate and salted caramel.


And fabulous message from lovely customer.  It's such a bonus when people take the time to send you feedback.   Thanks so much Victoria, and happy birthday Tom!


Friday, August 05, 2016

Superhero wedding inspiration - August 2016

Another excellent wedding inspiration article from Charlotte at Hitched featuring mine and many other Superhero inspired Wedding cakes.  Some great ideas here!

http://www.hitched.co.uk/wedding-planning/cakes/superhero-wedding-cakes_1155.htm


Tuesday, August 02, 2016

Alice in Wonderland topsy turvy wedding cake - July 2016


My first topsy-turvy cake.  

There are so, so many things you could pick to put on and Alice cake! The bride especially is a big fan of the books, the original Tenniel illustrations, and the various disney films so we talked about what are her favourite things from each.

Here's the list, have look and see if you can spot everything:
playing cards
cheshire cat
hatter's hat
chess board
disney rose bushes
disney signs
mirror
bread and butterfly
Mome Raths (disney version, not small green lost pigs!)
Rocking horsefly
the garden of live flowers
toadstools

So, first thing was... the sketch.  


Next I started to make all the bits and pieces that were to go on the cake.


Now, the problem with a design like this is that there is so much you can't do 
until you've baked, crumb coated and covered the sponge...and you can't bake too far in advance because you want the cake to be fresh!

I expected not to get much sleep for this one.


Now, the sponge...

The 4 tiers were (from top to bottom)
Strawberry and champagne
Orange and Elderflower
Rhubarb and Ginger
Lemon Drizzle

There were some things I could do in advance though, so I slow roasted some strawberries and rhubarb.  The rest had to wait until closer to time.


It's easy to underestimate how much goes into a big tiered cake. 

Just as a quick guide, an average home baked cake would use around 4-6 eggs.  
This cake used 58. 

It also used 24 bars of butter
34 lemons
18 oranges
28 sticks of rhubarb
and a mountain of sugar


Now, the topsy part.  
First, I did lots of research.  There are two basic methods: 
1. make the top a big slope and rely on friction and maybe a central dowel to stop it sliding sideways and 
2.  cut the slope, but then hollow out the middle so it's level so the weight is spread in the usual way. 

Because it was going to be a tall cake, that I was going to have to transport quite a long way, I chose the second.

Of course, what the research didn't initially tell me, and what I soon came to 
realise was; 
* all the demo cakes had a big difference between the size of the tiers (so when you cut out, there's a substantial rim that can support itself).   My design was using the modern style of tall tiers with only an inch shelf on each side.

* There was a real danger, if I followed the instructions I'd seen, when I put the fondant covered tiers together that the icing would be damaged because once the fondant was on I would be trying to put a 10¼" diameter cylinder into a 9¾" hole (and with a rim only 1 inch wide in the first place, there wasn't much margin to fix this).  I was certainly not going to be able to decorate the tiers before stacking.

As you can see below, I decided to make the rims a little narrower and reinforce them with skewers, then I covered the tiers in fondant.  
I used Carma Massa Ticino.  I like this sugarpaste for lots of reasons, but in this situation it's perfect.  It's got such flexibility that I could roll it thinner than some (so less danger of it fouling the next tier)  and it stretched well so I could get it nicely shaped around the carved cake without the danger of it tearing like the awful sugarpastes I was forced to use at my old bakery 


Even though I'd cut the rims a little smaller, they still did foul slightly.  Looking the photo below, you can see how the top of the pink tier has been pushed out slightly and the skewers have in turn shifted the lower layers sightly causing it to look a bit like it's slumped.

I decorated the tiers once it was all stacked.  


I used a central dowel to ensure that there was no chance of the whole thing shifting sideways en route.  I've tried sturdy cake stackers twice and wasn't impressed either time.  I'll stick with my screw, washers and wooden dowel method.  

I didn't put the top tier (the hat) on until we were at the venue 

To make the hat tilt, to make sure it was well anchored, and to put the wired roses into I cut a poly styrene wedge and covered it completely in black fondant to seal in any bits.

A wedding cake is going to sit there a long time, and it was a hot day, so it's important that the top cake, which was going to be on a tilt, couldn't shift sideways.  Inside the hat is 2 layers of strawberry cake, with a rice crispy treat base.  This gave it the strength needed to stake it into the poly separator.

The brim of the hat was made of a mixture of modelling chocolate and fondant, so it had the strength and malleability of the chocolate, but it would take the same edible paint as the the top when I airbrushed it.

I put a lot of the pieces on at the venue, and placed the hat on top.


The final touch, and something I was quite pleased with, was the stand.  
I saw a great vintage styled cake dome which had black stripes on it, but couldn't find a stand like that anywhere... so I painted one of my white stands with black acrylic paint.  I really think it looks so much better than a simple white stand would.

The whole place looked amazing though.  Heaven Farm is a magical place and all the styling and little touches were so well thought out.

Best of all though, look at the lovely message I got from the happy couple the next day...


Wishing you both all the luck and love in the world.  I know you'll be very happy.
x Kass x


Sunday, July 31, 2016

Fishing cake for 60th birthday party - July 2016

Victoria Sponge birthday cake for a keen fisherman.  He didn't want any fuss... but that was never going to happen so his family organised an amazing party at the brilliant Long Furlong Barn and, judging by the reports, it was fantastic!


Got some lovely feedback as well, which always makes me feel happy 😃

Happy birthday Stewart!


Monday, July 04, 2016

Rananculus birthday cake - July 2016

Birthday cake for a special lady.

Brandy soaked rich fruit cake, covered with marzipan and finished with fondant icing.  Decorated with sugar rananculus, filler flowers and a message framed by trailing pink jasmine.  

Pretty happy with the finished cake, and was very happy with getting a slice of the fruit cake too!  

Hardly ever get a slice of my own fruit cake (I'm never at the parties) but I absolutely love it.  It's packed with fruit and cherries and almonds and orange and booze... 


 Happy birthday Nikki 
xxxx

Wednesday, February 10, 2016

BB8 cake topper - Jan 2016

Another topper to go to France for a family friend's birthday.  

Fleet's birthday co-incided with the newest episode of Star Wars coming out, so what else could I make for this Star Wars fan's birthday but a BB8 topper!


I used a polystyrene ball inside modelling paste for the main body to keep the weight down.   I made some lettering to go on the cake as well and dusted everything with a little silvery / grey dusting colour to make it feel more like the style of the film props.


Happy birthday Fleet xxxx

NOTE:  These and many other toppers are available in my Etsy shop.
https://www.etsy.com/uk/shop/KasserinaHome?ref=hdr_shop_menu

Sunday, May 10, 2015

Cheers 'en! - May 2015

For my beautiful friend and bride-to-be Sal, a cake to sum up how so many nights have ended... with her asleep in her dinner!

Sal has many talents (she really does), but one of the most famous ones is that fact that she can be comatose in any position, but won't spill a drop of wine.  The first time I witnessed Sally falling asleep in her dinner with a glass of wine in her hand was in an Italian restaurant in Palmers Green, so for her Hen party I thought this would be a good thing to represent in cake.


The "How To..." part:

First I cut some foam core to size for the walls, covered it in fondant, pressed in some decoration with a patchwork cutter and brushed with a little gold lustre dust.  
I added some wood cladding and hand painted some extra tones of brown onto it.


I stuck on some hand painted sugar pictures, a specials board and a potted plant.


I got some metal right angles from the hardware store and screwed them into a cake drum.  NB.  These would not come into contact with the cake as the back walls and a cake card would act as a barrier.


Using a glue gun and some screws, I fixed more foam core to the right angles...


covered the back in more fondant, textured it with a brick effect and brushed it with some blossom tint.


Then I attached the interior walls to the exterior and filled in the gaps between front and back with some mortar style fondant.


Onto this platform I put the actual cake, a 10", 2 layer chocolate fudge cake with vanilla buttercream (nom, nom, nom!), having painted in some black floor tiles.  I placed the whole  lot on a couple of covered drums.


Meanwhile, I had been making the toppers.  I used foam core and armature to support them.


I put a little ½ cocoform, ½ flowerpaste dough onto the armature as a base, 


then I modelled one limb at a time, added a dress and the hair.


The glasses... I'm sorry to say, they are not edible.  I've tried to make them out of edibles, but haven't yet been happy with the outcome. Thankfully, I have the most amazing dolls' house shop in easy driving distance!  Promise though, they are my only cheat!


The party was centred around the wonderful Hotel Pelirocco in Brighton, and the cake fitted very well into the decor there!


Of course, we were a few cocktails down by the time it got cut...


so there were seconds for breakfast!

Spot the difference...


Sal, I love you... Ladies, I salute you... I feel like hell warmed up now, but I've laughed so hard and can't wait for the wedding!!! xxxx


Thursday, May 07, 2015

Sharing the cake love...

Just registered with a charity who... well, I'll let them explain;

Baking A Smile is a VERY special cake store, we are a not for profit organisation that provides FREE beautiful custom made celebration cakes to children with life threatening and life limiting health conditions throughout the UK and Ireland.
We are committed to providing a smile and a little happiness to children dealing with illnesses by providing the child with a custom made cake free of charge. We not only provide this service to children with life threatening/limiting illnesses, but also to the siblings of these children, as we understand that it can be tough on them too.
We believe in the power of happiness and smiles and the positivity it can have. If we can bring a smile to a child & their family then hopefully, just for a moment, they can have something happier to focus on.
Baking A Smile was established In December 2012. We have a large team of amateur & professional bakers on hand, donating their time, experience & money to provide amazing cakes for ill children and to fundraisers - which are not only full of yumminess but jam packed with love.


If you're a baker too, why not register and help bring some happy into the lives of people who deserve it!

http://www.bakingasmile.org