I am a cake obsessive, based in West Sussex, UK.

I started off making cakes for family and friends before giving up a proper career in favour of playing with sugar full time. Having worked for two bakeries making their wedding and celebration cakes, I am now looking toward world domination with breaks for coffee and chat.

If you are interested in seeing future projects, enter your email address in the box on the right for updates.

To see my website go to: www.kasserina.com. You can email me on info@kasserina.com.

I also sell some sugarcraft items on Etsy. Please go to https://www.etsy.com/uk/shop/KasserinaHome?ref=hdr_shop_menu

Thanks for looking!
Showing posts with label Sussex. Show all posts

Tuesday, December 22, 2015

Gingerbread House learning curve - December 2015


So, it's been a few years since I last made a gingerbread house (and I wasn't caking for a living then!).  

I found a great looking little book on Christmas Gingerbread so decided to try it out using the beautifully illustrated instructions.  It was great learning curve.

Lesson 1:  the gingerbread in the book (2 kinds) tastes absolutely great, but spreads terribly in the oven despite being made exactly as instructed, and not over mixed.  the resulting pieces didn't fit together well at all, so had to make a second batch and re-cut them while still warm.  Edges weren't great then though. I couldn't re-cut my windows so they looked like half closed eyes.

Lesson 2:  the gingerbread recipe in the book, even when baked for far longer than stated, is not really stable enough to support the weight of the larger houses.  The walls start to bow very quickly.


Lesson 3:  the caramel glue advised in the book is a tricky animal.  It gives no second chances for positioning, which is a thing, but the big problem with it is that (while it might work fine in a dryer environment) it's been stormy here and the caramel absorbs the moisture from the air, then beads and drips sticky, discoloured water all over your pretty design.  I'm not using that again.

Lesson 4:  the piping that I did when the pieces were lying flat, simply didn't adhere well to the gingerbread so that when upright they started to break and fall off, especially when the soft centred gingerbread started to bow.  Experimenting later on I found that if I lightly sprayed the surface with a little water before piping, the royal stuck a bit better. 

Obviously you have to to wait for the icing to dry and the water to evaporate before you can do anything with the pieces.


So, lessons learned, I used a more stable (more biscuit stye) dough that is less liable to spread or bow for subsequent houses and it all went much better.  Here're the photos of the experimental one though.  It's not too bad, but I wouldn't be comfortable selling it!


...oh, and by the way...
!! Happy Christmas !!


Saturday, September 19, 2015

Sunshine girl birthday cake - September 2015

Our amazing, talented and very treasured girl has another birthday.  


The design was inspired by a wedding cake design that she came up with herself a few weeks back. 


Start them young... the lure of cake doesn't hurt of course. She says when she's big she plans to work in the bakery with me so she can draw and eat cake mix all day.  (She's not worked out how much washing up is involved yet!)

I added to the words she had on her version, words about who she is.


The brief for this cake was "girly, maybe with some nail varnish, but definitely with lots of coloured cake inside like the Hungry Catapiller cake you did".  

As you can see from the off cuts below, coloured cake...check! 😉


Beautiful sunshine, I can't believe how grown up you are.  
We love you darling girl.  
Always be you, you are awesome!!!
xxxx

P.S.  The cake didn't last long once the kids saw the rainbow layers inside!


Sunday, May 10, 2015

Cheers 'en! - May 2015

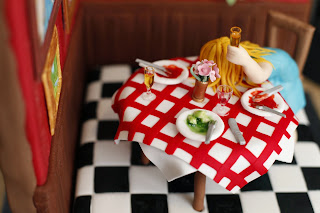
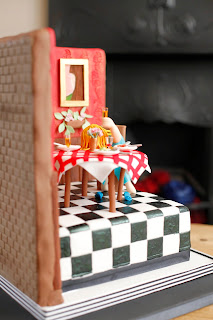
For my beautiful friend and bride-to-be Sal, a cake to sum up how so many nights have ended... with her asleep in her dinner!

Sal has many talents (she really does), but one of the most famous ones is that fact that she can be comatose in any position, but won't spill a drop of wine.  The first time I witnessed Sally falling asleep in her dinner with a glass of wine in her hand was in an Italian restaurant in Palmers Green, so for her Hen party I thought this would be a good thing to represent in cake.


The "How To..." part:

First I cut some foam core to size for the walls, covered it in fondant, pressed in some decoration with a patchwork cutter and brushed with a little gold lustre dust.  
I added some wood cladding and hand painted some extra tones of brown onto it.


I stuck on some hand painted sugar pictures, a specials board and a potted plant.


I got some metal right angles from the hardware store and screwed them into a cake drum.  NB.  These would not come into contact with the cake as the back walls and a cake card would act as a barrier.


Using a glue gun and some screws, I fixed more foam core to the right angles...


covered the back in more fondant, textured it with a brick effect and brushed it with some blossom tint.


Then I attached the interior walls to the exterior and filled in the gaps between front and back with some mortar style fondant.


Onto this platform I put the actual cake, a 10", 2 layer chocolate fudge cake with vanilla buttercream (nom, nom, nom!), having painted in some black floor tiles.  I placed the whole  lot on a couple of covered drums.


Meanwhile, I had been making the toppers.  I used foam core and armature to support them.


I put a little ½ cocoform, ½ flowerpaste dough onto the armature as a base, 


then I modelled one limb at a time, added a dress and the hair.


The glasses... I'm sorry to say, they are not edible.  I've tried to make them out of edibles, but haven't yet been happy with the outcome. Thankfully, I have the most amazing dolls' house shop in easy driving distance!  Promise though, they are my only cheat!


The party was centred around the wonderful Hotel Pelirocco in Brighton, and the cake fitted very well into the decor there!


Of course, we were a few cocktails down by the time it got cut...


so there were seconds for breakfast!

Spot the difference...


Sal, I love you... Ladies, I salute you... I feel like hell warmed up now, but I've laughed so hard and can't wait for the wedding!!! xxxx


Sunday, April 12, 2015

Running shoe cake - April 2015

40th birthday cake for a lady with a passion for running.

Vanilla buttercream covered chocolate fudge cake with dark chocolate buttercream filling.  

The sides are piped rose swirls in orange and pink. The top I kept smooth because of the toppers. 

I used the upside-down method to keep it ultra-smooth and swirled the colours to compliment the sides of the cake.


The number 40 and flowers are wired.  

The running shoe is made from a Mexican paste core shape with flowerpaste details.


Happy surprise birthday party Abbi :)


Wednesday, April 08, 2015

Confetti and lace wedding cake - April 2015

A quick dummy cake as I had plenty of pink confetti pieces left over.


This cake was featured as an editor's choice on Cake Decor this month.  Woohoo!

Sunday, November 09, 2014

Shark birthday cake - November 2014

It's that time of year again, time to make birthday cake for my gorgeous godson.  Can't believe he's so grown up!  

This year's theme is "SHARK !"


Had a look on the oh-so-reliable Pintrest and there are some great designs out there and great inspiration.  Obviously I had to create my own design though.  

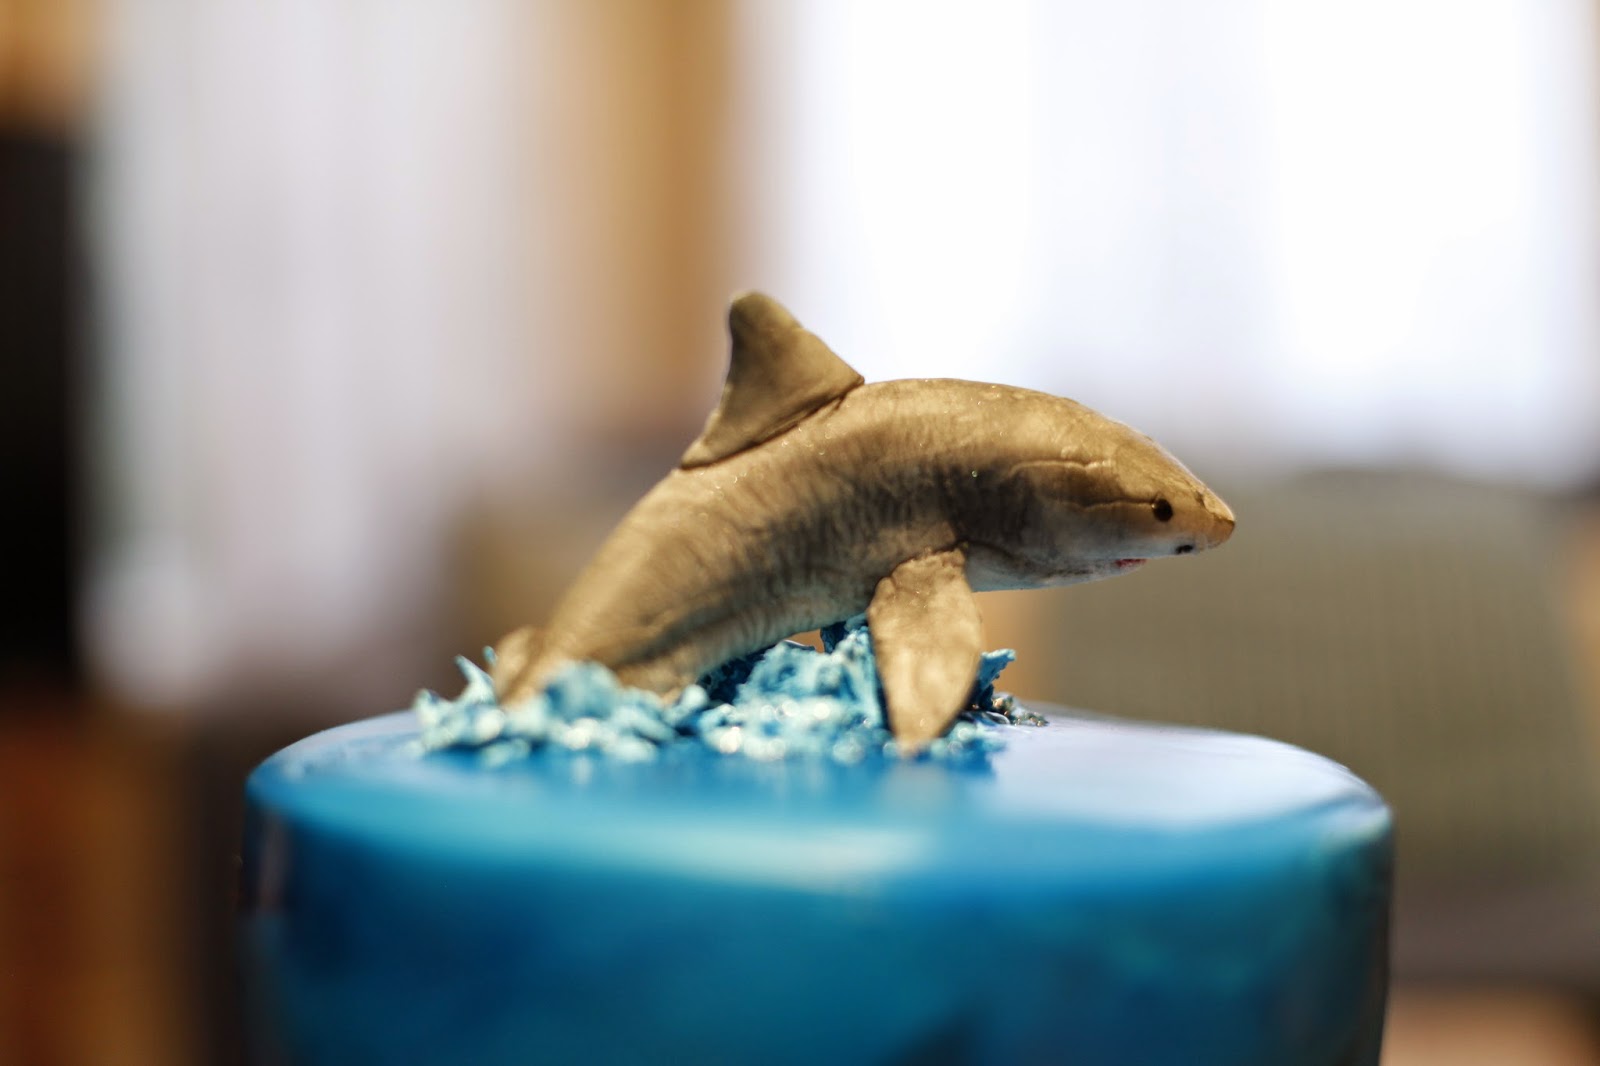
I found a fantastic image of a great white shark leaping from the water to catch a seal and wanted to try and capture that energy.  

There were also a couple of cakes I found that were "fish tank" style so I decided that maybe I could make a cake that was like a cross section of the ocean with the shadows of circling sharks and one on top leaping out in a realistic way... except without the eviscerated seal as that's perhaps a bit too much reality for a cake.

I would have liked to model my own shark, but my time was a bit limited this week so I cheated slightly and found a rubber shark on a toy shop, made a silicon mould of it and used flowerpaste  to form the hero shark, with some structural supports inside.  


As the flowerpaste dried it started to show seams a bit more, but rather than remake it I felt that it added to the realism as great white sharks tend to have some pretty big battle scars anyway.


I wanted to make the cake so you could see shadowey outlines of other sharks in the water.  I found some images of sharks and drew the outlines straight off the computer screen onto some paper.  


Then I cut up some ziplock bags and laid one side of the bag over the outline. I drew the image onto the plastic and cut it out.  I sprayed a little vodka onto the cake and stuck the plastic sheet onto it.  I lightly airbrushed over the sheet with the black and then carefully lifted off the plastic to reveal the silhouette of the shark.  I repeated this a few times with two different homemade stencils.


I wanted to try out a 3D splashing water effect on the base which worked well, although now I think I probably should have kept the clean lines of a flat board.  Well, that's what free family cakes are for though, being able to try out new things! 

I put my 7" round cake on a 9" board, and then that on a 12" board to give it an extra bit of drama and height.

I tore bits off my block of fondant and allowed it to "elephant" up a bit (oh, so easy with PME fondant!) so that it all looked rough and random like surf. 


I then airbrushed the whole thing with blue and teal.  I decided to massively over-do the spraying and let it gather and run to see how it worked as a watery effect, like light refracting through the water.  I also used a paintbrush dipped in vodka to take it off a little in places, then resprayed over it again.  I think it generally worked, but I took it too far.  


Next time I wouldn't use the paintbrush and although a bit of pooling worked well, I liked it better with a bit less on.  This is what my practice cakes are for though, so if I want to use this effect on a commission I now know how it works best.


Above:  after the first coat of airbrushing.

Below: the finished version

I liked it best when it was somewhere between the two.


To support the shark on top of the cake, I  inserted a dowel that extended past the top of the cake, but was supported at the bottom by the cake card I'd used at the mid point of the cake layers.  I covered up the exposed dowel with "splashing water".
I painted the tops of the waves with pale blue and white opaque edible paint.


Airbrushing is no friend of the manicurist.  I must remember to use gloves... and possibly a mask to stop me breathing it in! 


Oh, by the way, inside it was alternate torted layers of chocolate fudge cake and red velvet cake with white chocolate frosting, home-made raspberry jam and home-made summer fruits jam.  Num, num, num!

I couldn't be there for Ronnie's party this year (the first birthday of his I've missed the party for), but I hear it all went rather well.  At least I got to see him last night for cake drop off, hugs and catch up.  Moo, I love you.  Now stop growing, it's making me feel old! x